 Before we get into the intricate details of Microsoft Azure WebJobs, let us first ask, “Why should we use Timer Jobs?”
Timer jobs are background tasks/processes that run periodically. They are commonly used for long-running processes. Microsoft SharePoint provides certain default timer jobs (e.g., Health check of SharePoint, User profiles Sync). Timer jobs run on SharePoint under specific service accounts. Moreover, SharePoint gives the option of developing custom timer jobs, which are full trust or farm solutions that can be deployed on SharePoint server (basically, an on–premises environment).
Timer Jobs Functionality
Writing farm solutions is not feasible in SharePoint online version; however, developers can still achieve the timer jobs functionality without writing farm solutions by utilizing SharePoint Apps; i.e., writing the code in CSOM/REST API. Subsequently, developers can schedule tasks in Windows task scheduler for on-premises environment or by using Azure WebJobs for the cloud.
To understand this scenario clearly, let us consider the case of a website with large lists that must be archived on different lists. Further, the list’s date must be kept current, and must archive remaining data depending on the year and status of the record. In order to achieve this, the following options can be utilized:
Console Application
The console application is written using the capabilities of CSOM, which is responsible for performing archiving tasks at any specified time.
SharePoint App
SharePoint App, which is now named SharePoint ‘Add-in’ is utilized to authenticate and access SharePoint. Basically, the SharePoint App acts as a proxy between the console application and SharePoint online. The SharePoint App is a small unit of code which runs on SharePoint for specific business processes. SharePoint Apps can be written in any language and can be hosted on SharePoint. Further, they also act as hosted providers and are written predominantly using JavaScript or other client-side technologies.
Azure WebJobs
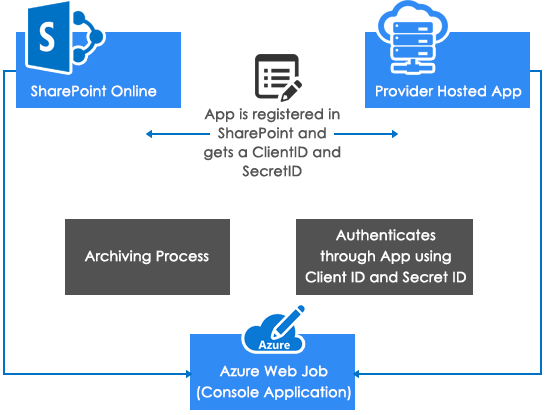
Azure WebJob acts as a scheduler for SharePoint online. Alternatively, any other Windows scheduler can be used. Here is a high level architecture of the required components:
- Console application runs on a scheduled time specified in Azure WebJob in WebApp.
- Console application uses Client ID and Secret ID for authentication and accessing SharePoint online.
Creating Timer Job
Here is a step-by-step approach to create a timer job:
Prerequisites
- SharePoint online site (preferably a developer site for testing).
- Azure Subscription.
Step 1 – Create a Console Application using Microsoft Visual Studio 2015/2013
Begin by creating a console application File > New Project > VisualC# > Console Application. Make sure .NET Framework 4.5.2 is selected.
Step 2 – Add SharePoint Assemblies from NuGet
Go to Visual Studio Tools > NuGetPackageManger > Manage NuGetPackage for solution (refer screenshot below).
Search for ‘App for sharepoint’ and choose ‘AppforSharePointonlineWebToolkit’ option and click on the install button.
After the installation, ‘SharePointContext.cs’ and ‘TokenHelper.cs’ are added to the console application. These classes help developers obtain SharePoint context using ClientID and SecretID.
Step 3 – Archiving List Items
Here is the code to write in the console application to archive list items.
File Name: Program.cs
[c]
static void Main(string[] args)
{
ClientContext clientContext = GetClientContext();
ArchiveListItems(clientContext);
}
[/c]
In the above code, we will see two helper methods. One is the ‘GetClientContext’ method, which helps obtain ‘ClientContext’ , whereas the second method contains the logic to archive list items.
Let us find out what the ‘GetClientContext’ contains. This method returns the ‘ClientContext’ which is passed to the ‘ArchiveList’ method. This can also be placed in the main method; however, it is written in a generic way, hence it can be utilized in other methods (if required).
[c]
private static ClientContext GetClientContext()
{
ClientContext clientContext = null;
var config = (NameValueCollection)ConfigurationManager.GetSection("Sites");
foreach (var key in config.Keys)
{
Uri siteUri = new Uri(config.GetValues(key as string)[0]);
// Get the realm of the user
string realm = TokenHelper.GetRealmFromTargetUrl(siteUri);
//Get access token for the the url
string accessToken = TokenHelper.GetAppOnlyAccessToken(
TokenHelper.SharePointPrincipal,
siteUri.Authority, realm).AccessToken;
//Get Client context with the access token
clientContext =
TokenHelper.GetClientContextWithAccessToken(
siteUri.ToString(), accessToken);
}
return clientContext;}
[/c]
In the above code, the ‘siteURL’ is read from ‘Sites’ element in App.config, along with ‘ClientID’ and ‘ClientSecret’, which are used in Tokenhelper methods. This is where the concept of ‘ApponlyContext’ comes to the forefront; here we obtain access token and ‘Clientcontext’, without passing any username and password. Moreover, it is running under App Context which is registered on the SharePoint site (explained in step 4).

The illustration below provides an overview of the SharePoint 2013 authentication flow.
The App is making a call to SharePoint, and does so by providing the OAuth access token. SharePoint ascertains that no user credentials were provided in the request and an OAuth access token is present. When acting on behalf of a user, the token will include user information, so the context will be App+User context.
The method below archives list items from ‘LogList’ to ‘LogList_Archive’ using a CAML query for filter condition; however, it remains a developer’s choice to extend the program and write any process using CSOM/REST API capabilities.
Note: Both source and destination lists should exist before running this method.
[c]
private static void ArchiveListItems(ClientContext context)
{
Console.WriteLine("authenticated to SharePoint Online");
List LogList = context.Web.Lists.GetByTitle("LogList");
List LogList_Archive = context.Web.Lists.GetByTitle("LogList_Archive");
context.Load(LogList);
context.Load(LogList.Fields);
context.Load(LogList_Archive);
context.Load(LogList_Archive.Fields);
context.ExecuteQuery();
Console.WriteLine("LogList fetched, loaded and ExecuteQuery’ed");
if (LogList != null && LogList.ItemCount > 0)
{
Console.WriteLine("The list exist, archive starts");
CamlQuery camlQuery = new CamlQuery();
camlQuery.ViewXml =
@"<View>
<Query>
<Where><And><Eq><FieldRef Name=’Status’ /><Value Type=’Choice’>Pending with Manager</Value></Eq><Leq><FieldRef Name=’Created’ /><Value IncludeTimeValue=’TRUE’ Type=’DateTime’>2016-12-31T23:23:33Z</Value></Leq></And></Where>
</Query>
</View>";
ListItemCollection listItems = LogList.GetItems(camlQuery);
context.Load(listItems);
context.ExecuteQuery();
Console.WriteLine("Query for listItems executed.");
foreach (ListItem item in listItems)
{
ListItemCreationInformation itemInfo = new ListItemCreationInformation();
ListItem itemToCreate = LogList_Archive.AddItem(itemInfo);
foreach (Field field in LogList_Archive.Fields)
{
if (!field.ReadOnlyField && !field.Hidden &&
field.InternalName != "Attachments")
{
try
{
itemToCreate[field.InternalName] = item[field.InternalName];
}
catch (Exception ex)
{
Console.WriteLine("[ArchivingListItems]Exception: " + ex.Message);
}
}
}
itemToCreate.Update();
context.ExecuteQuery();
}
context.ExecuteQuery();
Console.WriteLine("Finished Archiving the list..");
}
}
[/c]
Step 4 – Registering the App in SharePoint
To register the App, developers can utilize SharePoint 2013 URL ‘_layouts/15/appregnew.aspx’. Follow the steps below:
- Navigate to http://<yoursharepoint.com>/sites/dev/_layouts/appregnew.aspx.
- Click on Generate button to obtain a ClientID.
- Click on Generate button to obtain the SecretID.
- In AppDomain, input localhost.
- In RedirectURI field, input https://localhost:port#/
- Click on Create button, which will generate the ‘ClientId’ and ‘SecretId’ as shown below.
It is recommended to preserve or copy the above details, as these will be used in the next step. Also note that details in one of the screen have been masked for security reasons.
Note: There is no need to create an App from Visual Studio; here we are merely interested in the ClientId and SecretID, which will be used by the console program.
Step 5 – Granting Permissions
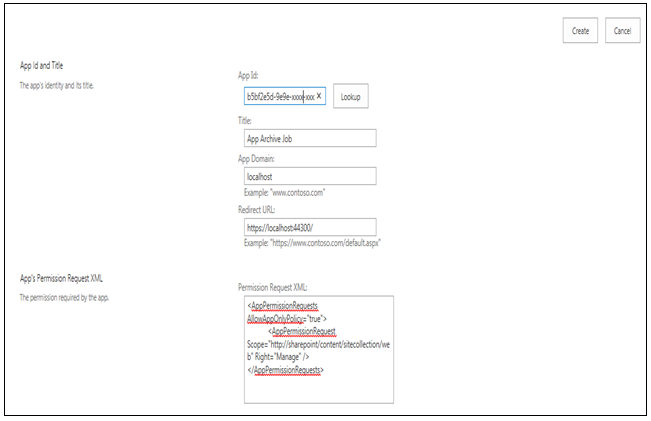
Grant permissions to the App that was created. Navigate to SharePoint 2013 URL ‘_layouts/15/AppInv.aspx’ and follow the steps outlined below.
- Navigate to https://<yourshareoint.com>/sites/dev/Appinv.aspx
- Paste the ClientID in ‘AppID’ textbox, which was generated following the above step, and then click on ‘Lookup’ button.
- It will show the App details, which were completed in earlier steps.
- Paste the following XML in ‘Permission Request XML’ textbox and then click on ‘Create’ button.
[c]
<AppPermissionRequests AllowAppOnlyPolicy="true">
<AppPermissionRequest Scope="http://sharepoint/content/sitecollection/web" Right="Manage" />
</AppPermissionRequests>
[/c]
In the steps above, we are trying to grant permission type ‘Manage’ to the website under site collection. Here, ‘Manage’ includes write permission, including managing lists, apply themes and border, and apply style sheets.
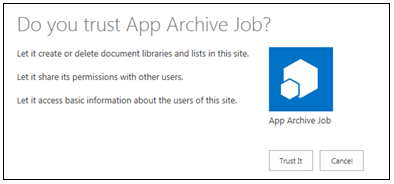
a) Trust App to obtain necessary permissions.
b) Update the App.config file with the generated ClientID and SecretID as specified below.
Step 6 – Scheduling the Timer Job
Jobs can be scheduled using Windows Scheduler (on-premises) or by utilizing Azure WebJobs for the cloud. Additionally, Azure WebJobs can be directly published from Visual Studio or the Azure management portal.
Publishing WebJob to Azure Portal
- Create the Zip file: To publish Azure WebJob first upload the zip file, which is the output of application from Visual Studio Build. Generally, all output files are available in the bin/debug or bin/release folder. In this case, we have used files from the debug folder.
The files are compressed in the zip file below.
- Go to Azure management portal (https://portal.azure.com) and create a WebApp. If the app is already available a WebJob can be directly created. WebJob is one of the services available under a WebApp.
- Click ‘AppService’ > ‘Add’ > Provide a name to the web site > Create
- Provide a name to the App in ‘App name’ field.
- After the ‘Create’ button is clicked, WebApp will be created and appears as shown in the screenshot below.
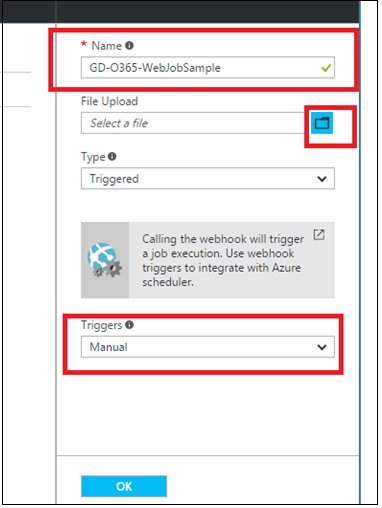
- Now that the WebApp is created, it is time to create a WebJob. Follow the steps below to create a WebJob. Click on ‘AzureTimeSite’ (YourWebApp) > ‘WebJobs’ > ‘Add’
Give a name to the WebJob and then click on the file option and upload the ‘Zip file’ that was created following step 6(a). Select type as ‘Triggered’ and manual from ‘Triggers’, and click on ‘OK’. Additionally, jobs can be scheduled at a particular time by using the schedule option available under the Triggers drop down (refer illustration below).
Click on ‘OK’ button, a screen will be displayed confirming Azure WebJob has been successfully created. Run the job by selecting and clicking the ‘Run’ option.

Job Monitoring and Reviewing Logs
Microsoft Azure provides the option of monitoring job status and reviewing job log. Moreover, complete details of the execution can be viewed including last run time, duration, failures, success etc.
Summary
This blog post is aimed to help developers understand the concept of ‘Azure WebJobs’. Additionally, it provides guidelines on how to replace timer jobs in SharePoint on-premises with Azure WebJobs in SharePoint online. Creating a WebJob is a simple straightforward and easily achievable activity. Moreover, developers can create complex Azure WebJobs by utilizing the full potential of Microsoft Azure. In the next blog, we will be looking at Asynchronous WebJobs.
How Can You Leverage SharePoint?
With more than a decade’s experience in providing Microsoft consulting services to global clients, Evoke has built a strong expertise in and around Microsoft SharePoint services. We have been helping global enterprises create and deploy SharePoint solutions that improve their productivity goals and provide a quick ROI. What sets us apart from our competitors is the usage and implementation of proven engagement models, coupled with our agile development approach to ensure the rapid deployment of SharePoint services. Here’s a quick look at our SharePoint services:
Evoke’s SharePoint Services
- SharePoint Implementation
- Configuration and Customization
- Planning and Integration
- Application Modernization
- Support and Administration
To make Evoke your one-stop SharePoint Services partner, please connect with us. Call +1 (937) 660-4925 or drop us an email at sales@evoketechnologies.com.


5 Comments
Nice Post with clear screen shots. Will be very handy for Provider Hosted Apps as well.
Thanks for the comments Sreeharsha
Nice article.. almost covered everything.. clear step by step explaination
Thanks Prashant, I am glad that you liked the blog post.
Thanks a lot for the solution. This is really a great help for us.